 Hi all, my head is so busy at the moment as we are packing to go away for a 10 day holiday to Great Keppel Island....off the north Queensland coast of Australia.....it's so exciting, we've had this planned now for a while as something spacial to celebrate our 20th wedding anniversary. strange how when we are the busiest we seem to get heaps done....sooo i wanted to leave you all with this tutorial for you all to try while im away. One of the ladies from my card making group bought this idea along to show me, I think its a nice change form the regular flat card fronts and looks great as a Christmas card idea. Ill post the pattern below...To make the poinsettia flower I used a large maple leaf punch cut into sections and a 1/2" circle punch to mount it on (not shown here).
I have circled the stamp i used and shown you here where to cut the leaf in sections for the flower, punch 3 leaves and cut each one in this way then mount then on the 1/2" circle punch. to add glitter to the swirly stamp i used a quickie glue pen and traced the swirls then added glitter.

Hers's another one i made. I added some more emboss lines around the edges and attached this cute little flower i learned to do by layering up 2-3 large flowers and 2 smaller ones. sponge some colour on them and put a brad through them all. Spray them with water and crunch each petal up how you would like it to sit and let dry. This works really well and dries quite hard. I then sponged a little more colour on it and added some glitter. And Ive also done a video of this card front as we all know we learn much easier by watching someone else do something.. i hope you all enjoy and catch you all when we get back!!....Valita

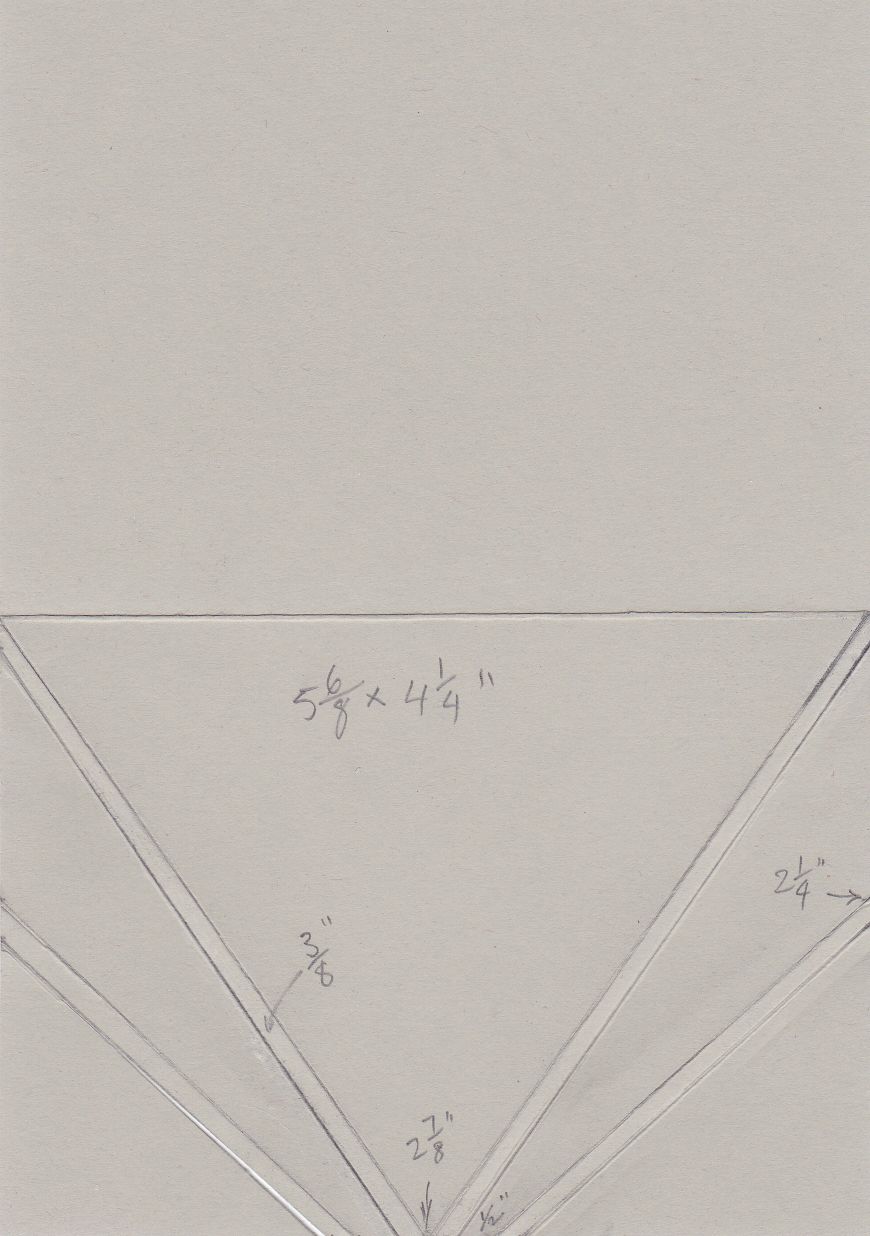
this ones in inches
and a last thought
Those who plan what is good
find love and faithfulness
Proverbs 14:22
In his heart a man plans his course
but the Lord determines his steps
Proverbs 16:9
Your cards look really great. My favorite is the christmas version.
ReplyDeleteThank you sooooo much for sharing and have a nice trip.
You are my new best friend!! LOVE your blog and all your great card ideas!!
ReplyDeleteTHANK YOU!!!!!!!!!!!!
Brilliant - absolutely brilliant!
ReplyDeleteThank you so much for sharing, your ideas are a great inspiration to me.
ReplyDeleteI LOVE this fold, so pretty. Thanks for sharing it with everyone!
ReplyDeleteI am so glad I stumbled across your blog. I am now an email subscriber. I tried your unique fold on a card. It is posted on my blog. Thanks so much for sharing~especially with a video tutorial.
ReplyDeleteHUGS
Gloria
Thanks for this wonderful tutorial!
ReplyDeleteI love it
It´s very easy!
Hugs
Tina
I am so excited to find a new card to make. Love the scrunched up flower and I have never thought to cut a leaf stamp to make a beautiful flower. How clever you are and so talented.
ReplyDeleteI do card swaps and the girls are going to be so jealous of my cards.
LOL I hope you are having a wonderful vacation. I leave in two days for ours.
Thanks so much!
Big Hugs!
I was so impressed with your folded card front that I just had to make one of my own. I did fudge a little on the folds as I don't have a Scor Pal. I will definitely make more with this technique. Thank you so much for sharing the idea and the tutorial. It's in my gallery on Splitcoast: http://www.splitcoaststampers.com/gallery/photo/1524571?&cat=500&ppuser=226367
ReplyDeleteGreywolf / Val
Valita, this is a truely stunning card! Thanks for the Tut on how to make it!
ReplyDeleteHugs
Carol
Hi Valita,
ReplyDeleteThank you so much for your great tutorial! I used it here..
I love your blog! it's beautiful and very inspiring!
thank you again.
Your cards are gorgeous.Thank you for sharing this technique and the great video.
ReplyDeleteJoAnn
This fold is great! I have linked you on my blog. Check out my card using your techinique here:
ReplyDeletehttp://stampndesign.blogspot.com/2009/12/folded-v-card-front.html
Thanks for the great idea!
SUPER fold Valita...THANKS..again!!!
ReplyDeleteWonderful I'm not usually one for shaped cards but this is so stylish I must give it a go :)
ReplyDeleteThanks for sharing
Von
Hi Valita,
ReplyDeleteI finally had the time to give it a try.
You can see the card here.
Hi Valita,
ReplyDeleteCongrats on your new blog look! it's fab and I love it.
I've made another card based on your great tutorial - here.
Thank you once again!
Thanks once again for a fantastic tutorial.I am going to love making these fold - deciding on how to decorate them will be the challenge.
ReplyDeleteThank you for the terrific tutorial. I don't ususally do special folds on my cards, but I think I'll try this one out. Daria
ReplyDeleteI love this flower.. it's so simple yet so effective.
ReplyDeleteWhat is the best paper/card
to use for this?
Thank you for all the inspiration
xxRosxx
Nice blog. I love flowers and it is cool to see a good website dedicated to it :D
ReplyDeletei like your blog hope you will continue a long time!
ReplyDeleteSo beautiful! What a great new fold!! Thanks for the tutorial, you make it look simple. Found your blog site through Shelly's Images.
ReplyDeletegeorgious flower. Great idea to form it with water. Will try to work with water for a next project.
ReplyDeleteHi Valita. Thanks for this great folded card. I have made one and would like to share it with you. it is http://stamptv.ning.com/photo/hydrangea-flowers?context=user
ReplyDeleteHope you like it. Ina
This is fantastic! Can't wait to make this uniquely folded card.
ReplyDeleteThanks so much :)
Lisa xx
Thank you, Valita, for your wonderful tutorials and ideas. I just made a Fall card with autumn leaves using this fold design and will be posting it on my blog tomorrow afternoon. I'm from New Jersey in the northeastern part of the US, so we are getting ready for Fall and the snow season that follows. I plan to do this card again using dark blue cardstock and white glittered snowflakes--should be a stunner! Thanks again for your ideas.
ReplyDelete